Apple Watch Security Settings: Must know by you!
The Apple Watch has been ablaze ever since it was unveiled for it is packed with robust features that have taken communication to the next level. With the advent of the Apple watch, monitoring channels of communication are eased out. From tracking down your fitness reports to gaining insights into notifications streaming in your iPhone has become so simple. With ease of tracking, there comes a sense of insecurity as anyone can peep into your notifications and know what’s up with your life. To protect your data and maintain your privacy, it’s essential to understand and utilize the security features that Apple has integrated into the watch. In this article, we’ll explore the must-know Apple Watch security features that help keep your information safe. Read on to unveil them.
- Part 1. Best of Apple Watch Security Features
- Part 1.1 Secure with Passcode
- Part 1.2 Automatic Data Erasure Post 10 Failed passcode attempts
- Part 1.3 Privacy of Notification
- Part 1.4 Apple Watch’s Data Privacy Security
- Part 1.5 Emergency Services
- Part 1.6 Find My Watch
- Part 1.7 Activation Lock Apple Watch Security Feature
- Part 1.8 Wrist Detection
- Part 1.9 Secure Pairing
- Part 1.10 Apple Pay and Wallet Security
- Part 1.11 Health Data Encryption
Part 1. Best of Apple Watch Security Features:
1.1 Secure with Passcode
Just as we shield our devices with respective passcodes, the Apple Watch can upkeep security passcode. It is an essential security feature that poses a barricade on anybody trying their hands on coming inside your phone. With this security setting in your Apple watch, no one can view the whereabouts of your phone’s activities, the details of your cards, etc.
For this, all you have to do is to follow the below steps:
Step 1: Open “Settings” on your Apple Watch.
Step 2: Select “Passcode” and enter your 4-digit passcode.

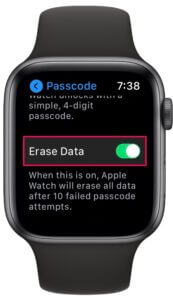
1.2 Automatic Data Erasure Post 10 Failed passcode attempts
When it comes to security, the watch can veil your information. For who knows, if you ever lose out on your Apple Watch, the correct settings will save your data. One such security feature is enabling the “Erase Data” option if someone repeatedly enters the wrong passcode, the watch will automatically erase all data after a maximum 10 numbers of failed attempts. This ensures that your information remains protected from unauthorized access. In order to put this feature on, go on to follow these steps:
Step 1: On your Apple Watch, open “Settings.”
Step 2: Just click on the “Erase data” option under the “Passcode” menu, and enable it.
1.3 Privacy of Notification
Apple watch’s signature functionality is to showcase the activities circling around your iPhone. Hence, the notifications shout-out from your Apple watch. Which can be viewed by any bad guy illegitimately access your phone. But don’t lose your cool as activation of security settings in your Apple watch comes to your rescue. The WatchOS is equipped with a feature known as ‘Notification Privacy’ which when enabled, alerts you but does not load with details of the notification. Thus, safeguarding your notification yet alerting you received one!
Here is how you can enable it –
Step 1 To get started, open the Apple Watch app on your iPhone.
Step 2 From the Watch app, click on the “My Watch” tab and locate for “Notification” option.
Step 3 Then, tap on “Notification Privacy” and slide it on the green positioning.

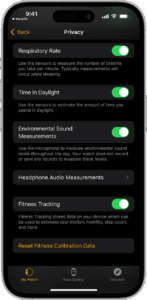
1.4 Apple Watch’s Data Privacy Security
The Apple Watch is flourished to display the up-to-date record of the activity swimming inside your phone. But if you are headstrong on keeping away the nagging noses coming between the dictionary of your life and you, then modifications in Apple Watch settings can deter any third party from accessing the view. All you need to do is head on to the “Privacy” menu featured in your Apple watch app and modify the display of your watch by sliding off the apps you don’t want anyone to know about. For example, you can exercise management on several features like location, health settings, analytics, contacts, etc.
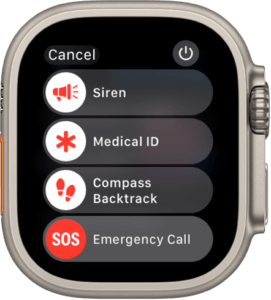
1.5 Emergency Services
Life is too uncertain and for any uncertainty that seeks immediate attention, especially if you are stuck or whatever, SOS stands as the viable option. By activating the security setting in the Apple Watch, it will duly ring the emergency contact with an accurate location. Also, if one has set the emergency you can even place a call.
So, to understand how your Apple Watch, one can use the security feature, follow the guide below:
Step 1:Firmly hold and press the side button of your watch until the Emergency SOS slider flashes on!
Step 2 Do not lose hold of your side button and wait till count down rings up and an alert to sound fires up. Now, drag the Emergency SOS slide.
Step 3 Once the countdown turns off, your watch will by default ring the emergency services.
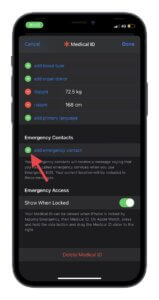
Here is the step-by-step tutorial to add emergency contacts using the Health apps –
Step 1: Load the Health app > click on “Medical ID.”
Step 2: Select “Edit” > locate “Emergency Contacts.”
Step 3: Hit for inserting an emergency contact in the list. Now, click on the contacts followed by adding the relationship you share with them.
Step 4 Once through, tap “Done” and save your settings.
1.6 Find My Watch
1.6 Find My Watch
Similar to “Find My iPhone,” the “Find My” app allows you to locate your lost or stolen Apple Watch. This feature can be a lifesaver in case your watch goes missing. To use this feature, use the below steps:
Step 1 To get started, simply open “Settings” on the Apple Watch app.
Step 2: Tap on your name. Choose the option “Find My Watch.”
Step 3: Enable the “Find My Watch” feature and pair your iPhone or iPad to your Apple Watch.

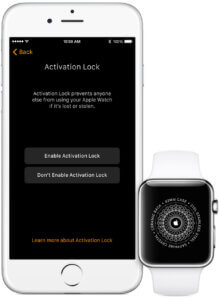
1.7 Activation Lock Apple Watch Security Feature
Activation Lock is a powerful anti-theft feature. If your Apple Watch is ever lost or stolen, this feature makes it nearly impossible for someone else to use or pair it with a different iPhone. To enable this feature, use the below steps:
Step 1: The first thing is to open your Apple Watch app on your iPhone or iPad, and opt for “Apple Watch” featuring under the “My Watch” menu.
Step 2: Then, hit on “Find My Apple Watch” to enable the Activation Lock feature.
You can widely view the location on the map and quickly enable lost mode which will prompt you to disable Apple Pay cards. Moreover, no one will be able to access your phone unless they hijack your Apple ID and password.
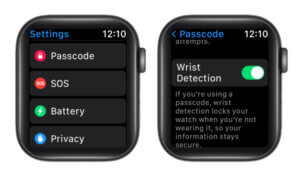
1.8 Wrist Detection
The Apple Watch has a wrist detection feature that automatically locks the watch when you take it off your wrist. This adds an additional layer of security, assuring that your data isn’t accessible when you’re not wearing it.
Step 1:Tap on the “Settings” app icon on your Apple watch to open it.
Step 2: Click on the “Passcode” menu and hit on the “Wrist Detection” option to enable it.
1.9 Secure Pairing
1.9 Secure Pairing
When you first set up your Apple Watch, the pairing process is secure and requires physical access to your paired iPhone. This ensures that your watch can only be set up with your explicit permission.
1.10 Apple Pay and Wallet Security
If you use Apple Pay on your Apple Watch, it’s protected by both a passcode and wrist detection. Your card data is not stored on the watch, adding an extra layer of security.

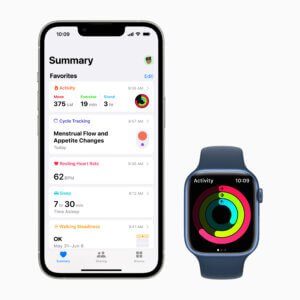
1.11 Health Data Encryption
The Apple Watch collects and stores health and fitness data. This data is securely end-to-end encrypted and is stored in the Health app on your paired iPhone.
Wrapping Up
The Apple Watch is not just a fashionable accessory; it’s also a device that contains personal and sensitive data. To protect your information and maintain your privacy, it’s essential to utilize the built-in security features that Apple has incorporated. By understanding and enabling these features, you can ensure that your Apple Watch remains a secure and trusted companion in your daily life. Remember, a few simple steps can go a long way in safeguarding your data and providing peace of mind. Also, enlighten us with your responses in the comments section.