Install Windows on Your Chromebook: A Step-by-Step Guide
Chromebooks are known for their simplicity and efficiency, but there are times when users may need the versatility of Windows for specific tasks. Installing Windows on a Chromebook is a game-changer, providing access to a broader range of applications and functionalities. In this comprehensive guide, we’ll walk you through the process of installing Windows on your Chromebook, from downloading the operating system to seamlessly integrating it into your device.
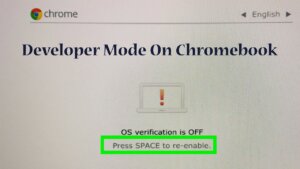
Before diving into the installation process, it’s essential to ensure that your Chromebook supports running Windows. Not all Chromebook models are compatible, so it’s crucial to check the specific requirements. Generally, newer models with Intel processors offer better compatibility. Verify your Chromebook’s compatibility with Windows to avoid potential issues during the installation process. To begin the journey of installing Windows on your Chromebook, you’ll need to enable Developer Mode. This process involves wiping your device’s local data, so make sure to back up any essential files before proceeding. Once your data is backed up: – Turn off your Chromebook. – Press and hold the Esc + Refresh keys simultaneously. – While holding these keys, press the Power button. – Release the Power button but continue holding Esc and Refresh until the device enters Recovery Mode. – In Recovery Mode, press Ctrl + D to enter Developer Mode.Part 1: Know About Compatibility
Part 2: Preparing Your Chromebook
1. Enter Developer Mode:
2. Enable USB Boot:
– Once in Developer Mode, access the Chrome OS settings by pressing Ctrl + Alt + T to open the terminal.
– Type “shell” and press Enter.
– Input “sudo crossystem dev_boot_usb=1 dev_boot_legacy=1” and press Enter.
– Reboot your Chromebook.
Part 3: Downloading Windows on Chromebook
Now that your Chromebook is in Developer Mode, you’ll need to download the Windows operating system. Follow these steps:
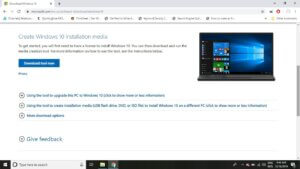
1. Access the Microsoft Website:
– Visit the official Microsoft website and navigate to the Windows download section.
2. Select Windows Version:
– Choose the Windows version that suits your preferences or requirements. For most users, Windows 10 is the recommended choice.
3. Create a Bootable USB Drive:
– Download the Windows ISO file and use a tool like Rufus or BalenaEtcher to create a bootable USB drive.
Part 4: Installing Windows on Chromebook
With the bootable USB drive prepared, it’s time to install Windows on your Chromebook:
1. Connect the USB Drive:
– Insert the bootable USB drive into your Chromebook.
2. Access the Boot Menu:
– Turn off your Chromebook.
– Press the Esc key or use a designated key to access the Boot Menu during startup.
– Select the USB drive as the boot device.
3. Follow the Windows Installation Wizard:
– The Windows installation wizard will guide you through the setup process.
– Choose your language, region, and other preferences.
– Select the installation location (create a new partition for Windows).
4. Complete the Installation:
– Allow the installation process to complete. This may take some time.
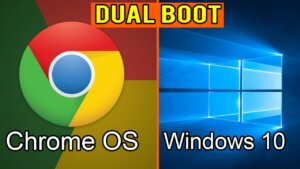
Part 5: Additional Tip: Dual Booting and Switching Between Chrome OS and Windows
To ensure a seamless experience, set up your Chromebook for dual booting:
1. Install the Chromebook Firmware Utility Script:
– Open the terminal in Chrome OS.
– Enter “cd; curl -LO https://mrchromebox.tech/firmware-util.sh && sudo bash firmware-util.sh.”
2. Select the Dual Boot Option:
– Follow the on-screen instructions to choose the dual boot option.
3. Reboot and Choose Your OS:
– Reboot your Chromebook, and during startup, press Ctrl + L to access the legacy boot menu.
– From the boot menu, select either Chrome OS or Windows to switch between the two operating systems.
Part 6: Troubleshooting Tips and Best Practices
While the installation process is generally straightforward, users may encounter challenges or seek additional customization options. Here are some troubleshooting tips and best practices to enhance your Windows-on-Chromebook experience:
1. Driver Updates:
After installing Windows, it’s crucial to update drivers for optimal performance. Visit the official support page for your Chromebook model to download and install the latest drivers.
2. Touchpad and Keyboard Functionality:
Some Chromebooks may experience issues with touchpad and keyboard functionality after installing Windows. To address this, consider using an external USB mouse and keyboard during the initial setup. Once Windows is fully installed, check for driver updates to resolve any compatibility issues.

3. Storage Allocation:
When setting up Windows, allocate sufficient storage space to ensure smooth operation. Strike a balance between Chrome OS and Windows partitions based on your usage preferences. You can adjust the partition sizes during the Windows installation process.
4. Chromebook-Specific Issues:
Certain Chromebook models may have specific quirks or challenges when running Windows. Stay informed by checking online forums, user communities, or your device’s support documentation for model-specific advice and solutions.
5. Regular Backups:
Before making any significant changes to your Chromebook, such as installing a new operating system, always perform regular backups of your important data. This precautionary step ensures that your files are secure and can be easily restored in case of unforeseen issues.
6. Exploring Virtualization:
If dual-booting is not your preference, consider exploring virtualization options. Tools like VirtualBox or VMware allow you to run Windows within a virtual machine on your Chromebook. This approach enables you to switch between Chrome OS and Windows seamlessly without rebooting.
7. Customization and Personalization:
Once Windows is up and running, take advantage of the customization options available. Personalize your desktop, explore the Windows Store for additional apps, and configure settings to suit your preferences.
8. Community Support:
Engage with the Chromebook and Windows communities online to share experiences, seek advice, and troubleshoot issues. Websites like Reddit, Chromebook Central, and Microsoft Community are valuable resources for user-generated content and support.
Part 7: Optimizing Performance and Security Measures
Now that you have Windows successfully installed on your Chromebook, it’s time to explore ways to optimize performance and implement security measures. These additional steps will ensure a smooth and secure experience while using Windows on your Chromebook:
1. Windows Updates:
Regularly check for Windows updates to ensure that your operating system is equipped with the latest features, security patches, and performance improvements. Keep your system up-to-date by enabling automatic updates or checking for updates manually.
2. Security Software:
Install reliable antivirus and anti-malware software to protect your Windows installation from potential threats. Windows Defender, Microsoft’s built-in security solution, is a good starting point, but you may also consider third-party options for added protection.
3. Chromebook Power Settings:
Adjust the power settings on your Chromebook to accommodate the demands of running Windows. Ensure that your device is plugged in during resource-intensive tasks to maximize performance.
4. Chrome OS Updates:
Keep Chrome OS updated to maintain overall system stability and compatibility with Windows. Regular updates from Google may include optimizations and improvements that enhance the dual-boot experience.
5. Backup Windows System Image:
Create a backup of your Windows system image after completing the installation and setting up essential applications. This backup serves as a snapshot of your configured Windows environment, allowing for a quick restoration in case of system issues.
6. Task Manager Monitoring:
Use the Windows Task Manager to monitor resource usage and identify any processes consuming excessive CPU, memory, or disk space. This information can help you pinpoint performance bottlenecks and optimize your system accordingly.
7. Chromebook Recovery Utility:
Familiarize yourself with the Chromebook Recovery Utility, a tool that enables you to create a recovery image for your Chromebook. In the event of critical issues, having a recovery image on hand allows you to restore your Chromebook to its factory state.
8. Chrome Remote Desktop:
Explore the Chrome Remote Desktop feature to access your Chromebook remotely. This can be particularly useful when troubleshooting issues or when you need to access files and applications on your Chromebook from a different device.
9. External Storage for File Management:
As your dual-boot setup may involve sharing files between Chrome OS and Windows, consider using external storage devices or cloud services for efficient file management. This ensures seamless access to your data regardless of the operating system you’re currently using.
Conclusion: A Versatile Chromebook Experience
By following these additional steps, you not only enhance the performance and security of your Windows installation on a Chromebook but also create a well-rounded and versatile computing experience. The ability to switch between Chrome OS and Windows seamlessly opens up a myriad of possibilities, making your Chromebook a powerful tool for various tasks and applications.
Stay proactive in maintaining your dual-boot environment, stay informed about updates and best practices, and enjoy the best of both worlds on your Chromebook. As technology continues to evolve, your device’s versatility ensures that you can adapt to new challenges and opportunities seamlessly.