iPhone Error 4013: Causes and Solutions for a Seamless Fix
In the realm of iPhones, users occasionally encounter various error codes that can disrupt the seamless functionality of their devices. One such troublesome error is 4013, often known as the iPhone error 4013. This article aims to shed light on what exactly error 4013 is, its potential causes, and most importantly, how to effectively troubleshoot and resolve this issue.
Error 4013 is a numeric identifier that typically occurs during attempts to restore or update an iPhone using iTunes. This error is associated with a communication failure between the iOS device and iTunes, leading to an interruption in the update or restore process. Users often see a message like “The iPhone could not be restored. An unknown error occurred (4013)” on their screens. A common culprit behind error 4013 is a faulty or unstable USB connection between the iPhone and the computer. Ensure that you use an Apple-certified cable and try connecting to different USB ports to rule out this possibility.Part 1. Insights about iPhone Error 4013
Part 2. Potential Causes of iPhone Error 4013
1. USB Connection Issues:

2. Outdated iTunes Version:
Using an outdated version of iTunes can lead to compatibility issues, causing error 4013 during restore or update processes. It’s crucial to keep iTunes updated to the latest version to ensure smooth communication with your iPhone.

3. Software Glitches:
Sometimes, temporary software glitches within the iOS system can trigger error 4013. This can be addressed by performing a force restart on your iPhone or using specialized tools designed to fix iOS issues.
4. Firewall or Security Software Interference:
Overzealous firewall settings or security software on your computer might block the communication between iTunes and your iPhone, resulting in error 4013. Temporarily disabling these security features during the update or restore process may resolve the issue.
5. Hardware Malfunctions:
In some cases, hardware issues, such as a faulty dock connector or damaged cables, can lead to error 4013. Inspect your cables and connectors for any physical damage and replace them if necessary.
Part 3. How to Fix iPhone Error 4013
1. Check USB Connection:
Start by verifying the USB connection between your iPhone and computer. Use an original Apple USB cable and try connecting to different USB ports. Ensure there are no loose connections or physical damage to the cable.
2. Update iTunes:
Ensure that you have the latest version of iTunes installed on your computer. Check for updates regularly and install any available updates to maintain compatibility with your iPhone.
2.1 Updating iTunes on Windows:
Open iTunes:
– If you have iTunes installed, open the application.
Check for Updates:
– Click on the “Help” menu located at the top of the iTunes window.
Select “Check for Updates:
– In the drop-down menu, click on “Check for Updates.” This will prompt iTunes to check for the latest version.
Follow On-screen Instructions:
– If an update is available, iTunes will provide on-screen instructions to guide you through the update process.
Download and Install:
– Follow the prompts to download and install the latest version of iTunes.
Restart iTunes:
– After the update is complete, restart iTunes to ensure the changes take effect.
2.2 Updating iTunes on Mac:
Open the App Store:
– On your Mac, open the App Store application.
Navigate to Updates:
– Click on the “Updates” tab in the App Store to see if there are any available updates for your installed applications.
Find iTunes:
– If there’s an iTunes update available, you should see it listed in the Updates section. Look for iTunes and click on the “Update” button next to it.
Enter Apple ID Password:
– If prompted, enter your Apple ID password to authorize the update.
Wait for Download and Installation:
– The App Store will download and install the latest version of iTunes. This may take some time depending on your internet connection.
Restart iTunes:
– After the update is complete, restart iTunes to ensure the changes take effect.
Now you should have the latest version of iTunes installed on your Windows or Mac system. Keep in mind that the steps and menu options may vary slightly depending on the specific version of iTunes and your operating system.
3. Force Restart iPhone:
Perform a force restart on your iPhone to address potential software glitches. The method varies depending on your iPhone model. Refer to Apple’s official guidelines for the correct procedure.
1. Quickly Press and Release the Volume Up Button:
– Press the volume up button located on the left side of the iPhone and quickly release it.
2. Quickly Press and Release the Volume Down Button:
– Immediately after releasing the volume up button, press and release the volume down button located next to the volume up button.
3. Press and Hold the Side Button:
– Press and hold the side button (also known as the power button) located on the right side of the iPhone.
4. Continue Holding Until Apple Logo Appears:
– Keep holding the side button until you see the Apple logo appear on the screen. This indicates that the iPhone is restarting.
5. Release the Side Button:
– Release the side button once the Apple logo is visible, and your iPhone will complete the restart process.
After the restart, your iPhone should function normally. If you encounter persistent issues or if the problem persists, you may want to contact Apple Support for further assistance.
Keep in mind that the process might vary for future iPhone models or if there have been changes in iOS updates beyond my last knowledge update in January 2022. Always refer to the latest documentation provided by Apple for your specific iPhone model and iOS version.
4. Disable Firewall and Security Software:
Temporarily disable any firewall or security software on your computer before attempting to restore or update your iPhone. Remember to re-enable these features once the process is complete.
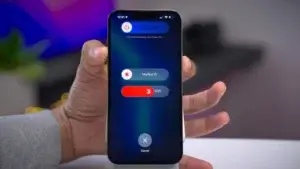
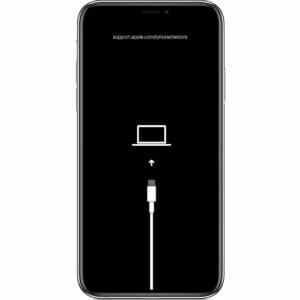
5. Use Recovery Mode:
If the above steps don’t resolve the issue, try putting your iPhone into recovery mode and then restoring it using iTunes. This can help bypass certain errors and initiate a clean installation of the iOS software.
6. Professional Repair Services:
If none of the above solutions work, it might be indicative of a more severe hardware issue. In such cases, seeking assistance from an authorized Apple service provider or visiting an Apple Store is recommended for a thorough diagnosis and repair.
Part 4. Common Pitfalls and Additional Tips
While the steps mentioned above cover the primary solutions for iPhone error 4013, users should be aware of common pitfalls and additional tips to ensure a successful resolution.
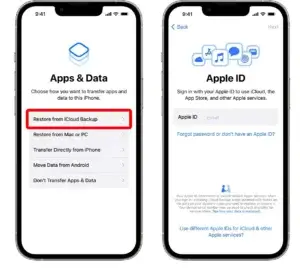
1. Backup Before Restoration:
Before attempting to restore your iPhone, it’s crucial to create a backup of your data. This ensures that even if the restoration process leads to data loss, you can easily recover your essential files and settings.
2. DFU (Device Firmware Update) Mode:
If the error persists, consider putting your iPhone into DFU mode. This mode allows for a deeper restore, wiping both the software and firmware. However, be cautious, as entering DFU mode is a precise process that involves specific button combinations. Follow Apple’s guidelines closely to avoid further complications.
3. Check for Third-Party Software Conflicts:
Sometimes, third-party software installed on your computer may interfere with the iTunes connection. Temporarily uninstall or disable any non-essential applications that might be running in the background during the restore or update process.
4. Inspect for Physical Damage:
A thorough physical inspection of your iPhone is essential, especially if the error persists. Look for any signs of physical damage, including water exposure, a bent chassis, or damaged connectors. If found, seeking professional assistance becomes even more critical.

5. Update Operating System:
Ensure that both your iPhone and computer’s operating systems are up to date. Running outdated software can lead to compatibility issues and hinder the restoration process. Regularly check for updates and install them promptly.
Preparation before update iOS:-
1. Connect to Wi-Fi:
– Ensure your iPhone is connected to a Wi-Fi network. It’s recommended to use Wi-Fi instead of cellular data to avoid excessive data usage.
2. Plug into Power:
– Connect your iPhone to a power source or make sure it has sufficient battery life. It’s advisable to have your device connected to power during the update to prevent any interruptions.
3. Backup Your Data:
– Before initiating the update, it’s a good practice to back up your iPhone to iCloud or iTunes to ensure that your data is safe. This step is optional but highly recommended.
Update iOS:-
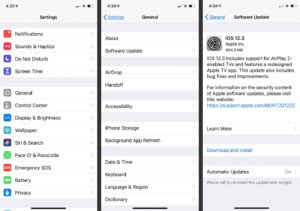
1. Open Settings:
– Open the “Settings” app on your iPhone. It’s represented by a gear icon and is typically found on the home screen.
2. Go to “General:
– Scroll down and tap on “General.”
3. Select “Software Update:
– Tap on “Software Update.” Your iPhone will check for available updates.
4. Download and Install:
– If a new iOS update is available, you’ll see a prompt to download and install it. Tap “Download and Install.”
5. Enter Passcode:
– If prompted, enter your device passcode.
6. Agree to Terms and Conditions:
– Read and agree to the terms and conditions. Tap “Agree” to proceed.
7. Downloading and Installing:
– The iOS update will begin downloading and then installing. This process may take some time depending on the size of the update and your internet connection speed.
8. Restart and Complete Installation:
– Once the download is complete, your iPhone will restart to install the update. You might see the Apple logo and a progress bar during this stage.
9. Setup Completed:
– After the installation is complete, follow any on-screen instructions to finish the setup. Your iPhone is now running the latest version of iOS.
Remember to keep your iPhone connected to Wi-Fi and power throughout the update process to ensure a smooth installation. Additionally, it’s a good idea to check for updates regularly to keep your device running with the latest features and security enhancements.
6. Seeking Professional Help:
If all else fails and the error persists, it’s advisable to seek professional assistance. Authorized Apple service providers or Apple Stores have the expertise and tools to diagnose and address complex hardware issues that may be causing error 4013.
Part 5. Advanced Troubleshooting Techniques:
For users who find themselves still grappling with iPhone error 4013 after exhausting the common solutions, here are advanced troubleshooting techniques that can help address more complex issues:
1. Check for Corrupted IPSW Files:
Ensure that the IPSW (iPhone Software) file you are using for the restore/update process is not corrupted. Download the IPSW file from official sources to eliminate the possibility of file corruption.
2. Reinstall iTunes:
Uninstalling and reinstalling iTunes can resolve any software conflicts or corrupted components. After uninstalling, download the latest version of iTunes directly from the official Apple website and install it on your computer.
3. Use Another Computer:
If the issue persists, try using a different computer for the restore process. This can help identify whether the problem is specific to your computer or if it’s a device-related issue.
4. Addressing NAND Issues:
Error 4013 can sometimes be attributed to NAND (flash storage) issues. Advanced users with technical expertise may consider reflowing or replacing the NAND chip. However, this is a highly intricate procedure and should only be attempted by professionals.
5. Review System Logs:
Analyzing system logs on both your iPhone and computer can provide insights into specific errors or issues occurring during the restore/update process. This can be a more technical approach, and users may need assistance from Apple support or forums to interpret the logs.
6. Check for Logic Board Damage:
Thoroughly inspect the iPhone’s logic board for any signs of damage or abnormalities. Water damage, burnt components, or loose connections can lead to persistent error 4013. If any issues are identified, seeking professional repair services is crucial.
7. Third-Party Repair Services:
In situations where the error seems to be hardware-related, reaching out to third-party repair services with experience in handling iPhone issues might be an option. These services may offer solutions for specific hardware problems, potentially saving time and money compared to official Apple repairs.
Conclusion:
While error 4013 can be a perplexing challenge, advanced troubleshooting techniques provide additional avenues for users determined to resolve the issue. It’s important to approach these techniques with caution, especially those involving hardware components, as any mishandling can lead to further damage.
For users who may not feel comfortable with the technical aspects of advanced troubleshooting, seeking professional help remains a viable and recommended option. Apple’s support channels, authorized service providers, and community forums can be valuable resources for guidance and assistance in resolving persistent iPhone errors.
Remember, each iPhone is a complex piece of technology, and a multi-faceted approach may be necessary to pinpoint and address the root cause of error 4013. By combining patience, diligence, and expert guidance, users can navigate through the intricacies of advanced troubleshooting and restore their iPhones to optimal functionality.