A Guide to Splitting Your Screen on Windows 11
Windows 11, the latest operating system from Microsoft, comes with a host of new features and improvements to enhance user experience. One such feature that aids in productivity is the ability to split your screen. In this guide, we will explore Windows 11’s split screen features and walk you through the steps on how to efficiently manage multiple applications simultaneously.
Windows 11 introduces a streamlined approach to multitasking with its intuitive split screen functionality. This feature allows users to divide their screen real estate between two or more applications, enabling a more organized and productive workspace. – Begin by launching the applications you want to use side by side.Part1. Understanding Windows 11’s Split Screen
Part 2. How to Split Your Screen on Windows 11
Follow these simple steps to take advantage of Windows 11’s split screen capabilities:
1. Open the Applications:

2. Maximize the First Application:
– Click on the title bar of the first application you want to include in the split screen.
– Select the Maximize button or drag the window to the left or right edge of the screen.
3. Snap the Second Application:
– Open the second application you wish to use.
– Drag its window to the opposite side of the screen or use the Snap Assist feature by pressing the Windows key + Left/Right arrow key.
4. Adjust the Split:
– Once both applications are snapped, you can adjust the split by dragging the divider between them.
5. Explore Split Screen Layouts:
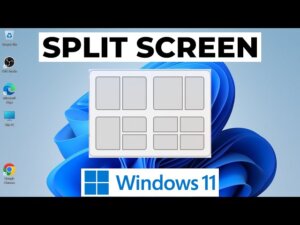
– Windows 11 offers various split screen layouts, including a 50-50 split, a larger window for the primary application, and a smaller window for the secondary application.
– Experiment with different layouts to find the one that suits your workflow best.
Part 3. Windows 11’s Split Screen Features
1. Snap Assist:
– Snap Assist is a handy feature in Windows 11 that automatically suggests additional open windows to fill the remaining screen space when you snap an application. This streamlines the process of organizing your workspace.
2. Task View:
– Utilize Task View by pressing the Windows key + Tab to see all open applications on a single screen. From here, you can easily drag and drop applications into the desired split screen configuration.
3. Virtual Desktops:
– Windows 11 allows you to create virtual desktops, each with its own set of open applications. This feature complements split screen functionality, providing an even more organized approach to multitasking.
Part 4. Tips for Optimizing Split Screen on Windows 11
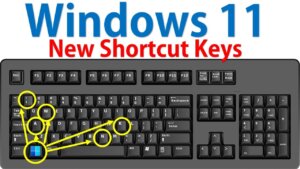
1. Keyboard Shortcuts:
– Learn and use keyboard shortcuts like Windows key + Left/Right arrow to snap and navigate between applications swiftly.
2. Customize Snap Settings:
– Access the Settings app and customize snap settings to your preference. Adjustments can be made to enable or disable Snap Assist and control the behavior of window snapping.
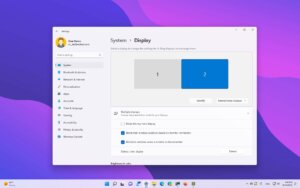
3. Multiple Monitors:
– If you have multiple monitors, take advantage of extended screen real estate by spreading your applications across different displays.
Part 5. Advanced Techniques for Enhanced Split Screen Productivity on Windows 11
As you delve deeper into the split screen functionality of Windows 11, you’ll discover advanced techniques and customization options that can elevate your multitasking game. In this section, we’ll explore additional features and tips to help you make the most out of Windows 11’s split screen capabilities.
1. Snap Layouts:
Windows 11 introduces Snap Layouts, a feature that takes split screen to the next level. When you hover over the maximize button of an open window, Snap Layouts options appear. These predefined layouts allow you to quickly organize multiple applications on your screen. Experiment with different Snap Layouts to find the arrangement that suits your workflow.
2. Snap Groups:
Snap Groups are another powerful addition to Windows 11. This feature lets you group related applications together and switch between them effortlessly. To create a Snap Group, snap an application, and then snap another application on top of it. Windows 11 will remember this grouping, making it easy to navigate through your tasks.
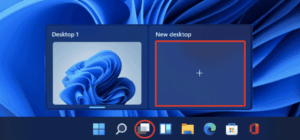
3. Customizing Virtual Desktops:
Virtual Desktops are an excellent companion to split screen functionality. Use the Task View to create and manage multiple virtual desktops, each with its own set of split-screen configurations. This way, you can organize your tasks based on projects or priorities, enhancing overall workspace management.
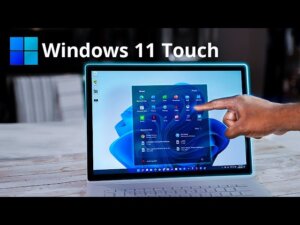
4. Touch and Pen Support:
For users with touch-enabled devices or those using a stylus, Windows 11 offers seamless touch and pen support. You can easily snap, resize, and move windows using touch gestures, providing a more intuitive and hands-on approach to split screen multitasking.
5. Multiple Instances of the Same App:
Windows 11 allows you to run multiple instances of the same application in split screen mode. This is particularly useful for tasks such as comparing documents or referencing information across different instances of a web browser.
6. Taskbar Customization:
Take advantage of Windows 11’s enhanced taskbar customization options. Pin frequently used applications to the taskbar for quick access, and utilize the new Taskbar Preview feature to switch between open applications with ease.
7. Snap to Corners and Edges:
Besides snapping windows to the left or right, you can also snap them to the four corners or the top or bottom edge of the screen. This flexibility enables you to create custom split screen arrangements, accommodating your specific workflow requirements.
8. Snap Assist Improvements:
Windows 11 has refined Snap Assist, making it more intuitive and responsive. As you drag an application to the edge of the screen, Snap Assist will provide clearer suggestions for the available split screen options, facilitating a smoother and more efficient multitasking experience.
9. Multitasking Shortcuts:
Mastering multitasking shortcuts can significantly boost your efficiency. Windows 11 offers a range of keyboard shortcuts, including Win + D to show the desktop, Win + Tab for Task View, and Alt + Tab to switch between open applications. Incorporate these shortcuts into your workflow for seamless navigation.
Part 6. Streamlining Your Workflow: Hidden Gems in Windows 11 Split Screen
As you continue to explore the depths of Windows 11’s split screen functionality, you’ll find a plethora of hidden gems designed to enhance your overall workflow. Let’s delve into some lesser-known features and customization options that can further optimize your multitasking experience.
1. Dynamic Window Resizing:
Windows 11 introduces dynamic window resizing, allowing you to adjust the size of snapped windows on the fly. Hover over the border between two snapped windows, and you’ll see a dynamic resizing cursor. Drag this border to resize both windows simultaneously, maintaining a harmonious split screen arrangement.
2. Custom Snap Grids:
For users who crave precision in their split screen layouts, Windows 11 enables custom snap grids. Press and hold the Shift key while dragging an application to the edge or corner of the screen, and you’ll notice that the window snaps to a custom grid, providing pixel-perfect control over your split screen setup.
3. Automatic Snap Suggestions:
Windows 11 is designed to adapt to your usage patterns. As you consistently use specific applications in split screen mode, the operating system learns your preferences. Over time, Windows 11 will start suggesting automatic snap configurations based on your habits, saving you valuable time in setting up your workspace.
4. Focus Assist Integration:
Windows 11 integrates Focus Assist with split screen functionality, ensuring minimal distractions during focused work sessions. When you enter split screen mode, Focus Assist can automatically activate, silencing notifications and allowing you to concentrate fully on the tasks at hand.
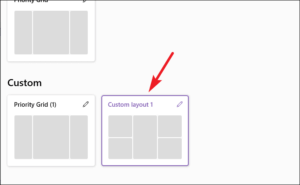
5. Snap Layout Presets:
Create and save custom Snap Layout presets tailored to your specific needs. This is particularly beneficial for users with consistent multitasking requirements. Once configured, you can quickly apply your saved layouts with a single click, streamlining the setup process for recurring tasks.
6. Snap Keyboard Shortcuts:
Beyond the widely known keyboard shortcuts, Windows 11 offers additional snap-related shortcuts. Win + Ctrl + Left/Right arrow keys allow you to cycle through open applications, while Win + Ctrl + D creates a new virtual desktop, providing even more flexibility in managing your split screen environment.
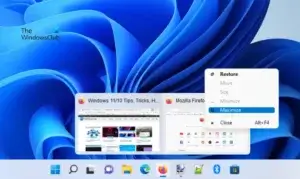
7. Taskbar Previews:
Enhance your multitasking efficiency with Taskbar Previews. Hover over an open application icon on the taskbar, and Windows 11 will display a thumbnail preview of the application’s current state. This feature facilitates quick identification and selection of active applications, reducing the time spent searching for the right window.
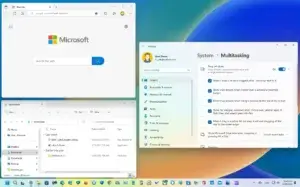
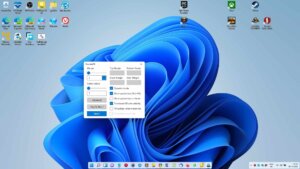
8. Aero Snap Customization:
Fine-tune the behavior of Aero Snap, the underlying technology behind Windows 11’s split screen functionality. Head to the Settings app, navigate to System > Multitasking, and explore options like “When I snap a window, show what I can snap next.” Adjusting these settings ensures that Aero Snap aligns with your personal preferences.
9. Touchpad Gestures:
Windows 11 supports touchpad gestures for split screen management. Swipe with three fingers to switch between open applications, and use a four-finger swipe to reveal Task View. These gestures provide a tactile and efficient way to navigate your split screen workspace on laptops equipped with touch-sensitive trackpads.
Conclusion:
As you uncover these hidden gems within Windows 11’s split screen functionality, remember that the operating system is designed to adapt to your unique workflow. Experiment with these features, mix and match different configurations, and personalize your split screen experience to suit your needs. Windows 11 not only brings a fresh and modern look but also a suite of tools that cater to both casual users and productivity enthusiasts alike. Embrace these hidden gems, and transform your computing experience into a seamless and highly efficient multitasking adventure.