Proven Methods to Fix iTunes Error 0xE8000015
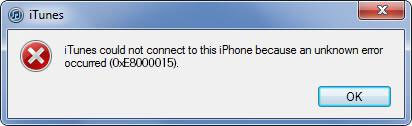
Unexpected turbulences or technical glitches are problematic in nature. Any of which hurdles the work altogether. One such problem is iTunes error 0xE800015 surfacing while restoring or updating an iPhone. It is one of the common issues, reportedly witnessed by a couple of users. Well, it usually occurs when the iPhone/ iPad is disabled, the iDevice fails to sync the computer, or due to faulty ports. We understand it’s very fretting to face these irksome. But, to cool your stress down, we’ve got you covered with some of the best fixes to assist you. Want to know? Stay tuned till the end.
- Part 1. Re-establish internet connection
- Part 2. Put your phone into Recovery Mode
- Part 3. Free up storage on iPhone
- Part 4. Reset your phone in DFU mode
- Part 5. Restart your device or iTunes
- Part 6. Try a new charge cord to the computer
- Part 7. Update iTunes to the latest version
- Part 8. Reset the iTunes lockdown folder
Part 1. Re-establish internet connection
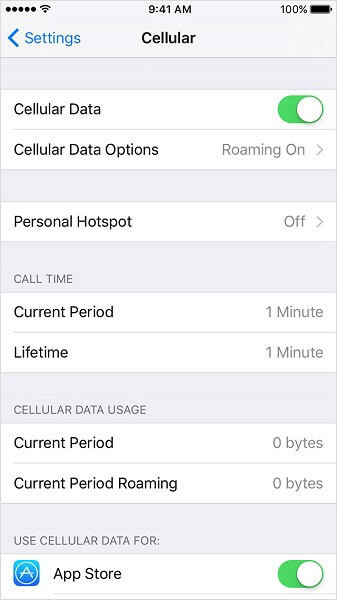
The very first pre-requisite is to have a firm Internet connection so that iTunes loads and runs without any error. Hence, ensure to have a stable internet connection to carry forward activities in iTunes. For this, you can restart your router and then check if the process goes smoothly. Also, try disabling and enabling the cellular data or Wi-Fi on your device and then check if everything settles down.
Part 2. Put your phone into Recovery Mode
Another way to fix iTunes error 0xE8000015 is to put your iPhone into Recovery mode and ensure to slides off the Windows firewall or any security software so as to perform Recovery Mode conveniently.
iPhone 6s and below:
- Firstly, switch off iDevice and press the ‘Home’ key. Ensure iTunes is working in the background and then attach the iPhone to the PC by lightning cable.
- Ensure to hold the ‘Home’ key until the ‘Connect to iTunes’ message is displayed.
iPhone 7/7Plus:
- Press the ‘Volume Down’ key after turning off the device. Now, connect your iPhone and PC/Mac while iTunes continues to work in the background.
- When ‘Connect to iTunes’ displays, release the ‘Volume Down’ button.
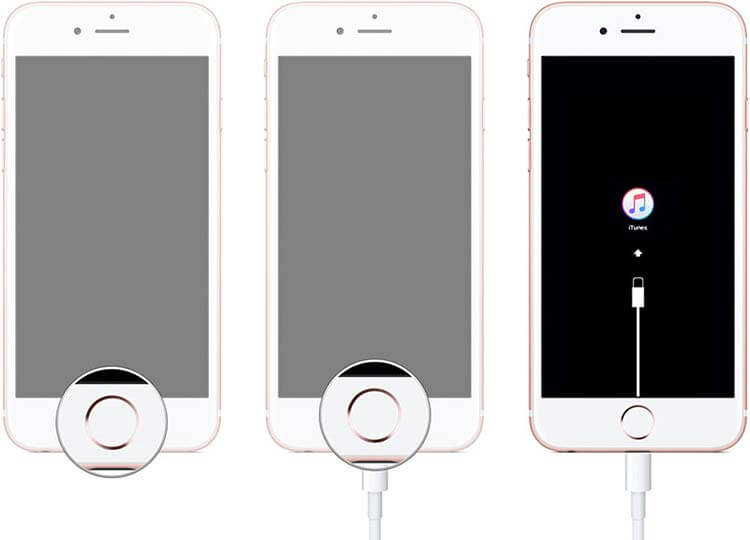
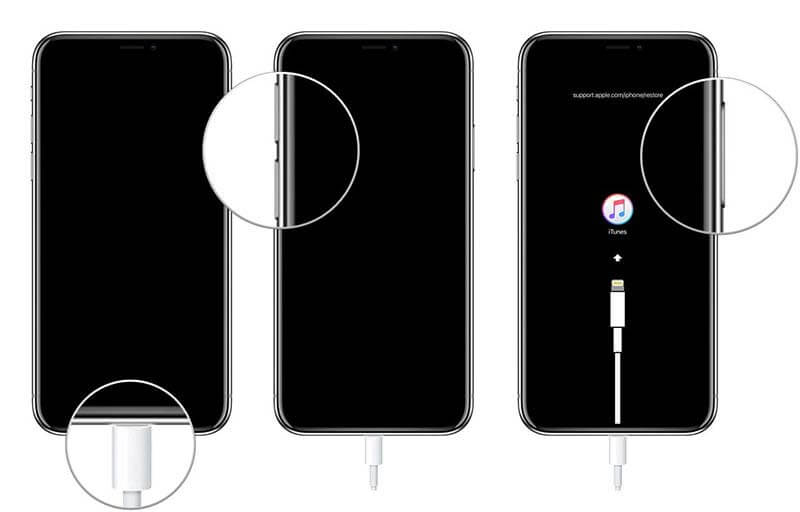
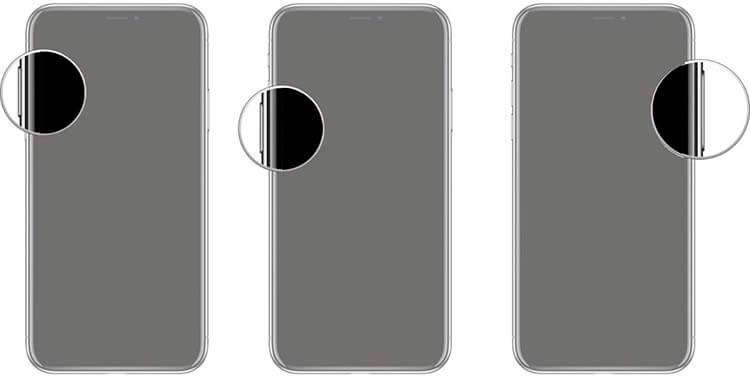
iPhone 8 or above:
- Click on ‘Volume Up’ key>‘Volume Down’ key. Now, hold the ‘Power’ key until ‘Connect to iTunes’ displays.
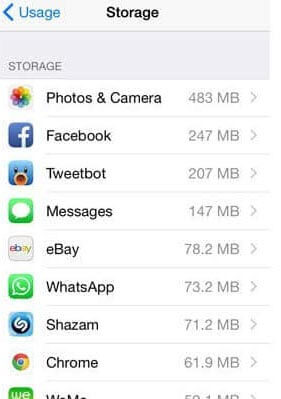
Part 3. Free up storage on iPhone
If your iPhone is running out of storage, then get rid of the unnecessary items you no longer need. Thus, restoring or updating an iPhone with iTunes would become free from iTunes error 0xE8000015. You can check the storage from your Settings and then delete the unimportant files accordingly.
Part 4. Reset your phone in DFU mode
You must slide off in Windows firewall or any security software and then head on to reset your iPhone in your DFU mode. Just follow the steps down to resolve iTunes error 0xE8000015.
- Using a USB cable, connect the iPhone to a Mac/PC.
- Now grab our device and perform this:
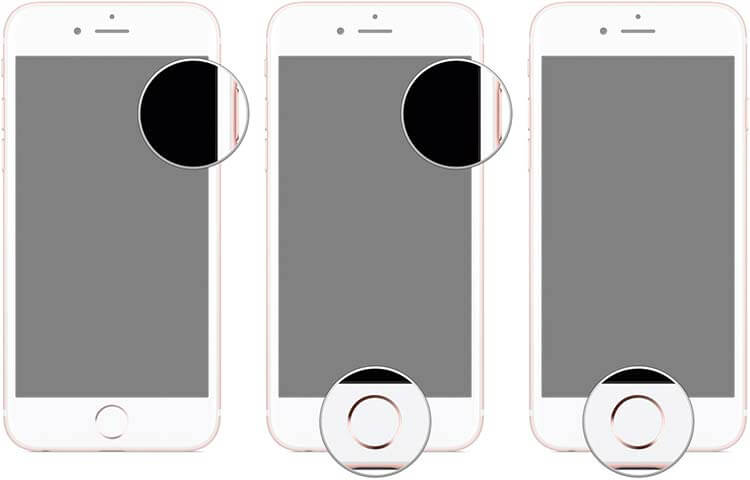
For iPhone 6/6 Plus:
- Press the ‘Sleep/Wake’ and ‘Home’ buttons altogether for nearly 10-12 seconds.
- Now, lose fingers from the Sleep/Wake button, not the other button. Once your iPhone turns black, it is directed to DFU mode.
For iPhone 7/7 Plus:
- The steps are almost the same as above. All you need is to replace the ‘Home’ button with the ‘Volume Down’ button
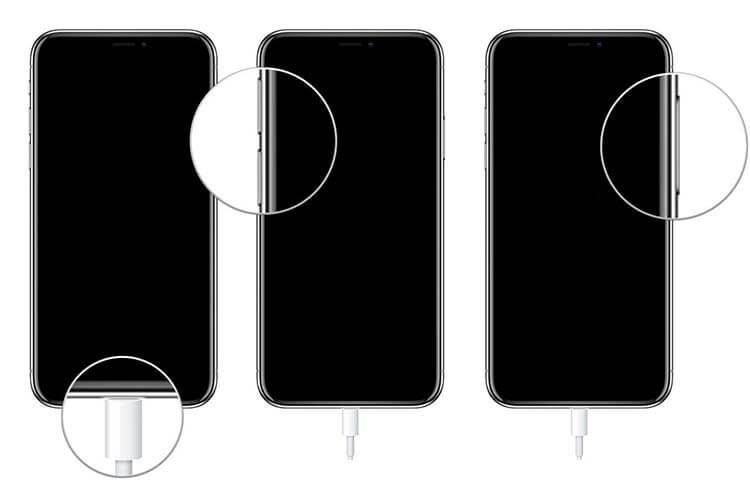
For iPhone 8 and iPhone X
- Hold and release the Volume Up button and repeat the same with the Volume Down button and then with the side button till the screen goes all black.
- Now, hold the volume down button while keeping the side button.
- After a couple of seconds, release the ‘Power’ button only until the iPhone’s screen shows up in iTunes.
- Release hold from the volume buttons and your phone will be turned to DFU mode successfully.
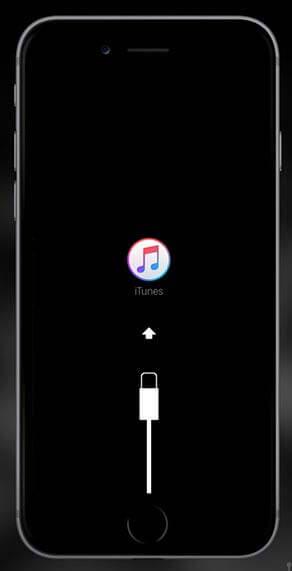
Once the device is in DFU mode, launch iTunes where “iTunes has detected an iPhone in recovery mode. You must restore this iPhone before it can be used with iTunes” will display. Tap on ‘Restore’ to finish off the process.
Part 5. Restart your device or iTunes
One of the organic means of resolving any type of issue or iTunes error like 0xE8000015, is restarting your device which may fetch you an error-free experience. Similarly, reload iTunes by exiting its window and re-logging in.
Part 6. Try a new charge cord to the computer
Strangely enough, on some computers, iTunes does not sync well and surface iTunes error 0xE8000015 error! Even, faulty cables are the culprits for interfering in the connection of iTunes. Thus, be sure to make use of a genuine cable and work in a different computer.
Part 7. Update iTunes to the latest version
Usually, iTunes error 0xe8000015 occurs when iTunes is not updated to upgraded version. So, to avoid any such errors, always work in an updated iTunes version. Here are the following steps for the respective operating systems.
Mac:
Launch iTunes and tap on the ‘iTunes’ menu followed by clicking on Check for Updates’ option, Apple’s servers will now look out for the latest updates.

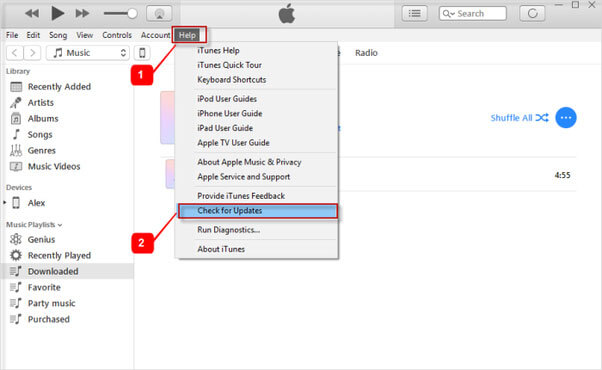
Windows:
Launch iTunes and click on the ‘Help’ menu from the main page. Select ‘Check for Updates’ and this will direct iTunes to draw links to Apple’s servers and look out for updates. Now, you can follow the prompts if there is an update available on your iTunes.
Part 8. Reset the iTunes lockdown folder
When iTunes fails to connect to the iPhone, the iTunes error 0xE8000015 takes place. To resolve it down, reset the iTunes lockdown folder from your system. Upon deleting it, iTunes renews the directory by starting the lockdown folder.
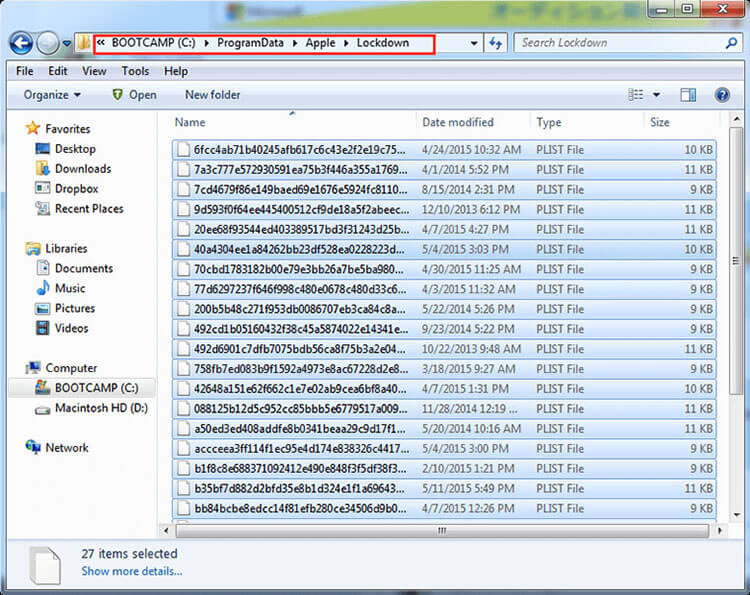
Windows:
- Firstly, click on the magnifying glass icon and click on the ‘Start’ button from your PC if you are using Windows 10, 8, or 7. For Windows XP click on ‘Start’> click on ‘Run’ and type in ‘%ProgramData%’ and press the Return button.
- Now, visit the ‘Apple’ folder and remove the ‘Lockdown’ folder.
Mac:
- Visit ‘Finder’ and click on ‘Go to Folder’ under the ‘Go’ option. Now, enter ‘private/var/db/lockdown’. Press on the ‘Return’ button and click on the ‘View’ icon. You will be able to view the files.
- Now remove the files available in the Lockdown folder. Please ensure not to delete the Lockdown folder.
Conclusion
In this article, we’ve witnessed a couple of solutions to unwind the iTunes error 0xE8000015 in your respective iPad and iPhone7/8. One can try out their hand in the aforementioned methods and free their iTunes with any errors or interruptions. For any queries, feel free to write us in the comments section.