Fix Windows Resource Protection Could Not Start the Repair Service
Struggling with the “Windows Resource Protection could not start the repair service” error while attempting to run the System File Checker (sfc /scannow)? Well, it can be really frustrating. This is because the System File Checker is a valuable tool trusted by countless users to address system-wide problems by autonomously identifying and repairing corrupted or missing files that may have been causing trouble on your computer. However, you may feel helpless in such a situation when the very tool designed to fix your PC’s problems encounters its own set of issues! But worry no more, you’ve reached the right place, in today’s post, we are going to understand the process of resolving the issue “Windows Resource Protection could not start the repair service” with some simple methods. Let’s get started.
“Windows Resource Protection could not start the repair service” is a phrase that spells frustration for many Windows users. Typically, this error pops up when trying to make use of the System File Checker tool, activated by the command “SFC /SCANNOW.” This tool’s vital role is to scan and mend Windows system files, ensuring the integrity of your operating system. However, the common reason behind its failure is the TrustedInstaller service, which is designed to safeguard core system files from accidental tampering. However when it comes to individual system files, they can still be vulnerable to corruption due to unforeseen circumstances. Now, without much ado, let’s begin with methods to rectify this issue and restore your system’s health. This method is carried out within the Command Prompt and is worth trying, as it requires administrative privileges for the modification.Part 1: Why Does it Say “Resource Protection Could Not Start the Repair Service” on Windows
Part 1.1: Method A: Run in cmd or Command Prompt
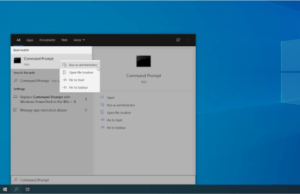
- If in case, you receive a prompt from the UAC or User Account Control, click “Yes” to grant administrative permissions for the application to launch.
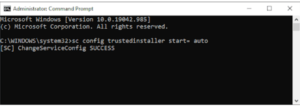
- Once the Command Prompt window is open, input the following command and press Enter key:
- sc config trusted installer start= auto
If the command is successful, you’ll see a “SUCCESS” message.
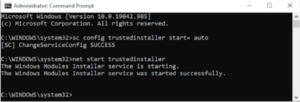
- Subsequently, run the following command:
- net start trustedinstaller
You should receive a message indicating that the Windows Modules Installer service has started successfully.
- With these steps completed, you can now try again to run the System File Checker with the help of the “sfc /scannow” command. If you still encounter issues, you can explore alternative methods below.
Part 1.2: Method B: Run the System File Checker in Safe Boot
There’s a chance that an underlying application or service might be causing interference with the System File Checker, preventing it from functioning properly. In such a scenario, you can attempt to run the scanning command in Safe Mode.
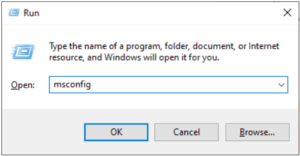
- Press the “Windows + R” keys on your keyboard to open the Run utility.
- Type “msconfig” (excluding the quotation marks) and press Enter. This action will launch the System Configuration application.
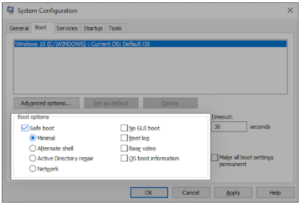
- Navigate to the Boot tab. Under the “Boot options” section, tick the box for “Safe boot” while ensuring it’s set to the “Minimal” configuration. Then, click the “OK” button.
- Restart your computer. It will boot in “Safe Mode”, excluding any third-party applications and only activating necessary services. Open the Command Prompt and execute the “SFC/scannow” command to check if the SFC scan is functioning correctly.
Part 1.3: Method C: Restart Windows TrustedInstaller
The simplest solution involves manually re-initiating the necessary service. Here’s what you need to do.
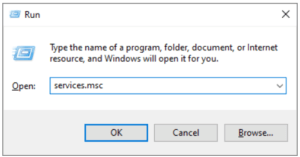
- Press the “Windows + R” keys on your keyboard to open the Run utility. Now, type “services. msc” and click “OK”.
- Right-click on the Windows Modules Installer service and select “Properties”.
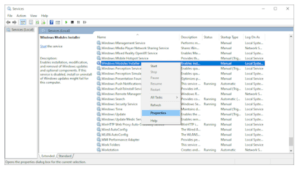
- Adjust the “Startup type” to “Manual”. If the service isn’t currently running, click the “Start” button. Then, click “Apply”, followed by “OK”. You will return to the list of services.

- Close the “Services” window and attempt to run the “sfc /scannow” command once more. If the scan still doesn’t function correctly, proceed to the next solution.
Part 1.4: Method D: Run the DISM Command
Certain users have reported that using the DISM command resolved the issues with the System File Checker. The Deployment Image Servicing and Management (DISM) tool essentially reinstalls your system image to address problems directly associated with it. Below are the step-by-step instructions:
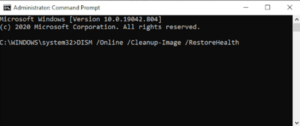
- Run the Command Prompt as Administrator in the same way as we did in Method A above.
- Once you are in the Command Prompt window, you need to enter the following command and press Enter key:
- DISM /Online /Cleanup-Image /restore health
- Allow the scan to complete, and then restart your computer. Upon returning to the Command Prompt, attempt to run the SFC scan again to check if it now functions as expected.
Part 1.5: Method E: Registry Editor
If you’re comfortable working with the Windows Registry editor, you can resolve this error by adding a new expandable string value to the Registry. However, please be cautious, as incorrect modifications to your registry entries can have serious consequences.
Note: Before proceeding with the setup, it’s essential that you make a backup of Windows registry files and establish a system restore point, allowing you to revert system-level changes and restore your PC’s functionality. Once you’ve taken these precautions, follow the steps outlined below.
This process is a bit complicated and technical. Therefore, to make the procedure more manageable, we’ve divided it into two parts.
1: Find TrustedInstaller ID and Sub-folder Name in File Explorer
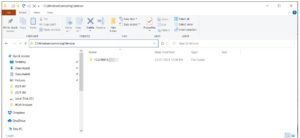
- Open File Explorer by pressing “Win + E” and navigate to the following location: “C:\Windows\Servicing\Version”.
- Here, you’ll find a folder with a name like “10.0.19041.1XXX” – this is your TrustedInstaller ID. Copy this ID/name to your clipboard or save it in a Notepad document for future use.
- Next, navigate to “C:\Windows\WinSxS” and, depending on your CPU, locate one of these subfolders:
- x86_microsoft-windows-servicingstack_31bf3856ad364e35_{TrustedInstaller ID} (for 32-bit Windows)
- amd64_microsoft-windows-servicingstack_31bf3856ad364e35_{TrustedInstaller ID} (for 64-bit Windows)
- In the subfolder name above, {TrustedInstaller ID} corresponds to the folder name you noted in step 2.
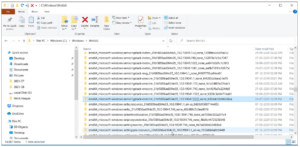
- Save the folder name and path in a Notepad file as well.
2: Create Expandable String Value in Registry Editor
Now that you have the necessary information, it’s time to add an Expandable String value in the Registry Editor. Here’s how to do it:
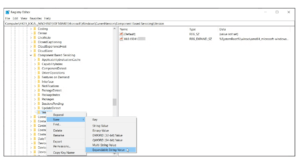
- Press “Win + R” to open the Run box. Type “regedit” and click “OK” to launch the Registry Editor.
- Now, you need to go to the following location in the Registry Editor (you can also copy and paste the below path into the address bar for quick navigation):
HKEY_LOCAL_MACHINE\SOFTWARE\Microsoft\Windows\CurrentVersion\Component Based Servicing\Version - Select the Versions subkey, right-click on it, and choose New > Expandable String Value.
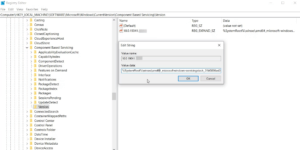
- Rename the value to match your TrustedInstaller ID name. After renaming, it will resemble something like this: 10.0.19041.1XXX.
- Double-click on the newly created value and paste the path of the folder identified in WinSxS into the Value data field, which will look similar to this:
%SystemRoot%\winsxs\amd64_microsoft-windows-servicingstack_31bf3856ad364e35_10.0.19041.1XXX_none_7e3d47227c694b34.
- Ensure you correctly use %SystemRoot% and exclude “C:\Windows” from the folder path. Click “OK” to save the changes.
Note: If you encounter an “Error creating value” message while adding a subkey or string value, it’s necessary to take ownership of the Component-Based Servicing key. You can accomplish this by following the steps below.
How to Take Ownership of a Registry Key
- In the Registry Editor, right-click on “Component-Based Servicing” and select “Permissions.”
- In the “Permissions” window, click the “Advanced” button in the “Security” tab.
- The Owner, by default, is set to TrustedInstaller. Click on the “Change link.”
- Type your username and click “Check names”. Click “OK” to save the changes.
- Check the “Replace owner on sub containers and objects” box and click “Apply” to make the changes.
- After changing the ownership, you can modify the registry keys to add new values and subkeys without encountering any errors.
Once you are done with making necessary changes in the Registry, reboot your computer and then check if the SFC scan is running effectively or not.
Part 1.6: Method F: Run Automatic Repair
There are times when you need not perform all these technical steps; you can simply perform automatic repair, and the system may fix the issue on its own. Here’s how to do it.
- To access “Advanced startup” you need to press and hold the Shift key while hitting the “Restart” in the Start menu. This will trigger Windows to boot with Advanced Startup Options.
- Now, you need to choose “Troubleshoot” > “Advanced options” > “Automatic Repair”. The Automatic Repair tool will now be launched. Wait for it to complete the scan and repair.
Once done, reboot your PC normally to Windows and see if the SFC scan works as expected.
Closing Remarks
Although the “Windows Resource Protection could not start the repair service” error is frustrating, it can be resolved successfully. This article has equipped you with a toolkit of methods to troubleshoot and resolve the issue, ensuring your Windows system’s optimal health and functionality.
From Command Prompt to DISM command utilization, Safe Boot, and Windows Registry adjustments, we’ve explored a range of solutions. However, it’s crucial to exercise caution, creating system restore points and registry backups to avoid data loss and system corruption risks.